Showing posts with label iPhone Tips. Show all posts


You might be looking for cheat of your SimCity games. After launch your SimCity, just shake the iPhone and you will get a text box to enter your cheat.


Type this to set construction costs to $0 per item: i am weak

Type this for all extra rewards: pay tribute to your king
Type this to legalize gambling for 50 years: the casino

Type this for recycling plant, waste to energy incinerator and normal incinerator:
garbage in, garbage out

Type this for High tech industries:
nerdz rule

If you would like see review and install the cracked .ipa file here.


The mobile Safari does a great job and makes web surfing fun and easy. That said, you may want other browsing options. Just do a simple search for “browser” in App Store, you’ll find ample of safari-alternatives available for download. You may already use one of the alternative browsers on your iPhone to browse the web. You love the browser and really want to stick with it. However, when someone sends you an email with a link in it, you can’t use your favorite browser to open the URL. When you tap on the link, it’s still Safari that loads the web page for you.

So, how can you change the default web browser to your favorite on iPhone? As of now, Apple does not allow you to do so. It only allows you to change the default search engine but there is no way to alter the default browser. With a jailbroken iPhone, however, you can utilize a hack called Browser Changer to set your favorite browser as the default.

Simply launch Cydia and search for Browser Changer. The hack is completely free and you can just tap the “Install” button to install it. Once installed, you can go to Settings > BrowserChanger to configure it.


The Browser Changer is enabled by default. Just tap on Selected Browser to select the browser you want to set as the default one. The hack supports 15 different browsers in total such as 360 web browser, Atomic, iCab Mobile, Mercury Pro, Opera Mini, Skyfire, etc.


This guide will show you how to activate personal hotspot on your iPhone and share it with your wireless devices. To use personal Hotspot for the first time:

1. Go to Settings > General > Network > Personal Hotspot. This option will be available only if your network provider allows Internet tethering. If it worked before on previous versions of iOS, hotspot will work just fine.

2. Turn on Personal Hotspot by tapping once on the On/Off button. You will be prompted to enter a wi-fi password.

3. After entering the password hit Done. Next you will be asked how do you want to share the internet access. If the Wi-fi or Bluetooth radio are Off they will be turned on automatically.

4. Go ahead and choose Wi-fi and USB only. Your iPhone is now broadcasting a wi-fi network with the password you selected and the name of the network is same as that of your iPhone.

5. Now go to any wireless device like your iPod Touch or laptop and look for networks. My Mac was pretty quick to discover it.

6. The broadcast strength seemed strong enough. No matter where the iPhone was left in the room, the signal showed up pretty strong. Once connected, the iPhone will display a blue status bar(just like earlier with Internet Tethering) showing how many devices are connected.

7. If you keenly observe the hotspot service while using it, you will notice that it automatically shuts itself off after an hour approximately if not used. We do realize that wi-fi hotspots are power hungry and don’t go easy on our batteries. In order to make the hotspot active again just visit the Personal Hotspot pane which is now on the first page of your Settings app.

8. While the mobile hotspot is on over wi-fi, the iPhone can’t connect to other wi-fi networks. If you need to connect to other networks on the iPhone but leave the hotspot on go to Settings > Wi-fi and tap on Disconnect wi-fi clients.

In case you aren’t on a 3G network the hotspot will obviously stop when you make or receive a phone call. However, once the call is over everything resumes just like the call never took place.


During the iPad 2 event, Apple mentioned the iOS 4.3 will be available to all users on March 11. Our recommendation is to stay on iOS 4.2.1 a month after 4.3 is released as all its going to be is a headache.

BigBoss also pointed out the upcoming iOS update will come with an implementation of address space layout randomization (ASLR). Such implementation change will impact the way mobile substrate works. If you haven’t heard of mobile substrate, it is a code library that other tweaks depend on. So if mobile substrate doesn’t work with iOS 4.3, your favorite hacks like WinterBoard, BiteSMS, etc will not work either.

With 4.3 comes apple’s implementation of address space layout randomization (ASLR). In short, this will mess up the way mobile substrate works. You will need a new mobile substrate in order to use your favorite tweaks such as winterboard, sbsettings, bitesms, folder enhancer, etc. So you should definitely avoid 4.3 until an “official” jailbreak is released for it. Of course we will announce when that is right here.


Therefore, avoid upgrading to iOS 4.3 until a stable jailbreak solution is released.

Category: Games
Price: $9.99
Latest version: 1.00.06
Size: 361 MB

It delivers the first true fighting game on iPhone. This uncompromising fighter features all the visceral thrills, fantastic graphics and brilliant gameplay that are hallmarks of the series. Read more here..

Features:
-Fight as 14 Street Fighter characters in 11 different environments.
-Full move sets including Unique Attacks, Special Moves, Focus Attacks, Super Combos and Ultra Combos.
-For a true arcade experience, battle head-to-head on Bluetooth against friends and foes alike.
-Robust “Dojo” boot camp transforms neophytes into Street Fighter masters in five in-depth lessons.
-Customize the controls for your style of play. Move the buttons anywhere you want on the screen and set the level of transparency.
-Unleash super moves with a tap of the “SP” button, or toggle it off from the “Options” menu if you want to enter the button combo manually.
-Four levels of difficulty.

Note: Multiplayer is not supported on iPod Touch 1st generation and iPhone 1st generation.


Compatible with iPhone, iPod touch, and iPad. Requires iOS 3.0 or later . You can purchase via direct iTunes link OR download cracked .ipa file code:

http://www.appscene.org/download/4RHNqhuTwVa547a1aaf8
http://www.appscene.org/download/ci5WdDZKAH3caa2f8ccc
http://www.appscene.org/download/BP8jpyQ5Rw96ad5def5c

UPDATED: Download cracked .ipa file for version 1.00.02
http://www.fileape.com/dl/AymDNbyVqEVt3wec

UPDATED: Download cracked .ipa file for version 1.00.04
http://fileape.com/?act=download&id=EotC6fhnG8wpkIYj

UPDATED: Download cracked .ipa file for version 1.00.05
http://fileape.com/dl/WTfUlV7OPkLG9VPU

UPDATED: Download cracked .ipa file for version 1.00.06
http://fileape.com/index.php?act=download&id=jCAkysmKUrzUi6DT
http://fileape.com/dl/nXG8ZyUCR9SsRdvR
http://www.zshare.net/download/861678709358f932/
http://fileape.com/index.php?act=download&id=5wIr3OoHpYlO4rHo


It’s not easy to find your favorite one out of hundreds of iPhone themes. Browsing themes in cydia is sometimes considered as a tedious task. You have to tap through several buttons before you can preview a theme and usually the preview page is loaded with ads. There is a good news for jailbroken iPhone owners. Jay Freeman the developer of cydia has rolled out the Theme Center in cydia. Theme Center offers a much much better way to browse and download iPhone themes.


Simply tap on the button will bring you to the new Theme Center and access the theme library. You are allowed to select themes based on the model of your iPhone. If you’re using iPhone 4, you probably would opt for the HD themes with Retina support. Previewing a theme has never been so easy. With a single tap on the selected theme, the Theme Center will offer you a nice theme preview. If you love the theme, just tap the “Package” button and install it right away. According to the developer, all themes available are selected from the top selling vendors in cydia, as well as, free themes selected by folks at MacCiti and ModMyi. New themes will be added on biweekly basis. To avoid low-quality content, additional featured themes must go through nominations via one of the theme partners including MacCiti, ModMyi or Planet-iPhones). In future, however, the plan is to allow users to nominate themes directly to cydia rather than going through the partners.


If you love to skin your iPhone with some nice themes, go ahead to check out Theme Center on Cydia.

Let’s say you have purchased an iPhone app via iTunes on your desktop. How do you transfer it to your laptop? Since the release of iTunes 9 in September 2009, Apple introduced a new feature in iTunes called Home Sharing. It allows multiple computers (up to five) in the same local network to copy and share music, movies, apps and other media between computers.

It’s not a hidden feature. But even Apple has updated the iTunes to version 10, not every user have tried it. Here I’ll walk you through this fantastic feature and show you how you can transfer apps between computers easily. In the walkthrough guide, I’ll show you how to transfer the apps from desktop to your laptop so you keep the app library in both desktop and laptop in-sync.

NOTE: Before we start, make sure you have the following three things:

  • Both computers are installed with iTunes 9 or later.
  • You already have an Apple ID associated with an iTunes or App Store Account.
  • Both computers are connected to the same local network either via Ethernet or WiFi.

Enabling Home Sharing on Your Desktop

1. First, open iTunes on your desktop.

2. Click “Advance” and select “Turn On Home Sharing”.

3. Select the Home Sharing icon on the left-hand side of iTunes

4. You’ll be prompted to provide your iTunes account. Simply enter your iTunes or App Store account name and password.

5. Click “Create Home Share” to enable home sharing and then click “Done” to complete the registration.

Enable Home Sharing on Your Laptop

1. On your laptop, launch iTunes.

2. Go over the above 5 steps again to enable Home Sharing on your laptop. Make sure you use the same iTunes account to login Home Sharing.

3. For the first-time setup, you’ll be prompted with message “Home Sharing could not be activated because this computer is authorized for the account. Would you like to authorize now?“. Simply click “Yes” to confirm. iTunes will then show you a message telling you that the authorization is successful.


Transfer Apps from One Computer to Another

If you successfully complete the above procedures, you should now be able to access the desktop’s iTunes library from your laptop computer.

1. Just click the Home Share to connect to under Shared on the left-hand side of iTunes.

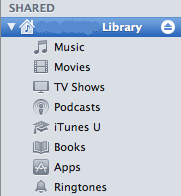
2. Select the “Apps” folder and pick the app you want to transfer. Say, let’s transfer the Cut the Rope app. Just click on it and drag it to your own library to transfer the app.

Obviously you’re not limited to transfer apps from other computers. You’re allowed to transfer other media such as music, movie, TV shows, etc.

Automatically Transfer Apps Between Computers

The above procedures let you transfer app (or other iTunes content) manually. iTunes actually offers an option for you to transfer these content in an automatic way. To enable automatic transfer,

1. Just select “Home Sharing” library and select “Settings”.

2. Select the content for automatic transfer.

In case you want to turn off “Home Sharing” after the app transfer, just click “Advanced” and select “Turn Off Home Sharing”. Enjoy

Apparently you do not want to share your own iTunes library with others. You want to keep your own library and create a new one for other users. There is a hidden feature that you may not know. iTunes does allow you to create separate library for individual user. Just hold down the Option key (for Mac User / Alt key (for Windows user) each time you launch iTunes. You’ll then be prompted with options to create a new iTunes library or choose an existing iTunes library.

Let’s say you’re now sharing the computer with your mum and dad. Simply select the “Create Library…” option and create a new library for your mum. Do the same procedures again to create the library for your dad as well.

Later when your dad needs to use iTunes, tell him to hold down the option key (for Mac) or Alt key (for Windows) when launching iTunes. Then select the “Choose Library…” option and select his own iTunes library folder.


By using this technique, each of you can keep music, movies or apps in a separate iTunes library. You can have a complete control of your own library. You can add/delete music or sync your iPhone without affecting other’s iTunes library. But please note that this method only works on iTunes 9.2 or up.

If you want switch your iTunes library to you new computer you may check it out here.

It’s actually quite simple to turn off in-app purchases – simply go to Settings -> General -> Restrictions (enter your 4-digit security pass code) -> Allowed Content -> In-App Purchases and turn the thing to OFF! If you’ve not set a 4-digit security code on your iPhone, now is a good time as ever to do so. Kids love clicking various buttons on the iPhone touchscreen and you can never rule out the possibility of accidental app purchases, therefore it’s better to be safe than sorry. And trust me, accidental app purchases are fairly common especially with kids.


Usually, the in-app purchases require the iTunes password to be entered. But if you’ve already entered the password in the last 15 minutes even for a free app, the in-app purchase does not prompt for password again.

Category: Education
Price: $2.99

Size: 2.4 MB

Latest version: 1.4.2

Take charge of your schedule and put iStudiez Pro to work for you. Take advantage of iStudiez Pro easy navigation and never miss another course, lecture and lab, track tasks and deadlines, plan homework, arrange assignments and more.


Features:

• Smart Today view automatically displays summary of current classes and tasks after basic schedule was input
• Fully-featured and detailed schedule planner
• Interactive multifunctional calendar including expanded month and week views
• Color labels to mark each particular course
• Stylish and comprehensively designed icons to distinguish key class types
• Support of iPhone/iPod's touch unique features like device rotation and touch gestures
• Integrated address book


Compatible with iPhone and iPod touch and minimum requires is iPhone OS 2.2.1 or later. You can purchase via direct iTunes link or download cracked .ipa file code:

http://getapp.info/download/iStudiez_Pro-v134-rcg.ipa
http://www.appscene.org/download.php?id=496773348
http://www.appscene.org/download.php?id=397274446

Updated: Download cracked .ipa file for version 1.4.2:
(Compatible with iPhone, iPod touch, and iPad. Requires iPhone OS 3.0 or later)
http://www.filedude.com/download/5KpmXtAXHPc80d9d2e01
http://www.filedude.com/download/yzSixZiFDZ25b9613558
http://www.filedude.com/download/P3K25cfXuHbee9c4858d

For some readers who are currently using the iPhone 3GS, they are still considering the upgrade. One, who is quite new to iPhone, said, what are the difference between iPhone 4 and 3GS? Needless to say, the iPhone 4 is a major upgrade over iPhone 3GS. Apple has published a comparison between these two phones at it website. But below comparison from Mahalo gives a better presentation.


Emoji icons are picture characters that are very popular in Japan for text messaging. Nearly all mobile phones in Japan have Emoji icons built-in. Since the release of firmware 2.2 in late 2008, Apple has brought Emoji icons to iPhone. However, it is for iPhone users using Softbank network in Japan only. For those who want to use Emoji icons on iPhone, simply follow the step-by-step procedures:


Step 1: Launch App Store and search for "Emoji Free". Simply install it and its free apps.

Step 2: Once installation is done, launch it and click the “ok, lets do this!” button to proceed.

Step 3: The process only takes a few seconds. After that, your iPhone is allowed to use Emoji icon.

Step 4: Click HOME button to go back to home screen. Tap “Settings” -> “General” -> “Keyboard” -> “International Keyboards” -> “Add New Keyboard…”. Tap on “Emoji”.

Step 5: You should notice a new Emoji keyboard installed after it goes back to the previous screen. You can then launch any iPhone app to try out the feature. To switch between different keyboards, you can tap on the “globe” button. In case it doesn’t work, restart your iPhone and try again.

iPhone Dev team has released an updated version of ultrasn0w to unlock iPhone 4. With ultrasn0w, you can free your iPhone to use with any carrier. The latest version of ultrasn0w supports carrier unlock for iPhone 4 with baseband 01.59.00, as well as, 3G and 3GS riding on baseband 04.26.08, 05.11.07, 05.12.01 and 05.13.04.


Note for T-mobile USA user: Please ensure you disable 3G service before installing ultrasn0w.

To Unlock iPhone 4, just follow these procedures:

Step 1: Upgrade your iTunes to iTunes 9.2 version or latest and backup your iPhone data by synchronizing it with iTunes 9.2.

Step 2: Use PwnageTool or Redsn0w or JailbreakMe to jailbreak your iPhone 4.

Step 3: Launch Cydia on iPhone and add “http://repo666.ultrasn0w.com” as the new repository URL. You can simply tap “Manage” -> “Sources” -> “Edit” -> “Add” to add the repository URL. If your not clear about this, checkout my post here on how to add sources to Cydia.


Step 4: Then tap “Search” and search for “ultrasn0w” application
Step 5: Install “ultrasn0w”

Step 6: Once the installation completes, reboot your iPhone. Your iPhone is unlocked and you are free to choose other carriers.

Developed by Teck Chia, Flora Sun and Tim Wuu, OpenAppMkt is a piece of smart thinking and quick implementation. And the best part - though Apple will hate it, it has no control over it. Similar to App Store & Cydia, OpenAppMkt offers both free and paid apps, albeit – only those which run within the Safari browser.

The Installation f OpenAppMkt is easy and quick – just visit the OpenAppMkt website and follow the onscreen instructions. It creates an OpenAppMkt icon on your iPhone’s home screen. Bear in mind, that when you download an app through OpenAppMkt, it actually doesn’t install anything on your phone, it merely creates a Safari bookmark on your homescreen.


As a developer, you can get your app listed on OpenAppMkt for free. However, developers who sell paid web apps will need to share 20 percent of their revenues with the founders. Chia insists that many iOS apps on the iTunes App Store are actually built with HTML5, JavaScript, and CSS and then compiled into an app before being sent to the iTunes Store for sale or download.

Here’s a video of the OpenAppMkt app in action.