 Let’s say you have purchased an iPhone app via iTunes on your desktop. How do you transfer it to your laptop? Since the release of iTunes 9 in September 2009, Apple introduced a new feature in iTunes called Home Sharing. It allows multiple computers (up to five) in the same local network to copy and share music, movies, apps and other media between computers.
It’s not a hidden feature. But even Apple has updated the iTunes to version 10, not every user have tried it. Here I’ll walk you through this fantastic feature and show you how you can transfer apps between computers easily. In the walkthrough guide, I’ll show you how to transfer the apps from desktop to your laptop so you keep the app library in both desktop and laptop in-sync.
NOTE: Before we start, make sure you have the following three things:
- Both computers are installed with iTunes 9 or later.
- You already have an Apple ID associated with an iTunes or App Store Account.
- Both computers are connected to the same local network either via Ethernet or WiFi.
Enabling Home Sharing on Your Desktop
1. First, open iTunes on your desktop.
2. Click “Advance” and select “Turn On Home Sharing”.
 3. Select the Home Sharing icon on the left-hand side of iTunes
 4. You’ll be prompted to provide your iTunes account. Simply enter your iTunes or App Store account name and password.
 5. Click “Create Home Share” to enable home sharing and then click “Done” to complete the registration.
Enable Home Sharing on Your Laptop
1. On your laptop, launch iTunes.
2. Go over the above 5 steps again to enable Home Sharing on your laptop. Make sure you use the same iTunes account to login Home Sharing.
3. For the first-time setup, you’ll be prompted with message “Home Sharing could not be activated because this computer is authorized for the account. Would you like to authorize now?“. Simply click “Yes” to confirm. iTunes will then show you a message telling you that the authorization is successful.
Transfer Apps from One Computer to Another
If you successfully complete the above procedures, you should now be able to access the desktop’s iTunes library from your laptop computer.
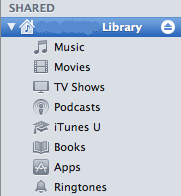
1. Just click the Home Share to connect to under Shared on the left-hand side of iTunes.
 2. Select the “Apps” folder and pick the app you want to transfer. Say, let’s transfer the Cut the Rope app. Just click on it and drag it to your own library to transfer the app.
 Obviously you’re not limited to transfer apps from other computers. You’re allowed to transfer other media such as music, movie, TV shows, etc.
Automatically Transfer Apps Between Computers
The above procedures let you transfer app (or other iTunes content) manually. iTunes actually offers an option for you to transfer these content in an automatic way. To enable automatic transfer,
1. Just select “Home Sharing” library and select “Settings”.
 2. Select the content for automatic transfer.


0 comments
Post a Comment