Before you run into the details of jailbreak, i would like to mention about "unlock" and "jailbreak" words here. You’re probably aware that the word “Unlock” is missing in the post title. It's meaning to say that, there is no solution to unlock iPhone 3G for 2.2.1 firmware so far. This statement valid by the time you read this post. That means you are still bind to single carrier and can’t use SIM card from other carriers.
Let me remind you here, "unlock" word is refer to the process to open up your iPhone to accept all carriers. Unlocked iPhone allows you to use SIM card from all carriers. You are no longer bind to the official carrier (e.g. AT&T) approved by Apple. And for, "jailbreak" your iPhone means you are allowed to install 3rd party applications on iPhone. This applies to all version of firmwares. Anyways, this post is devoted for iPhone 3G users who want to jailbreak their iPhones.
Note: This guide is now updated with procedures for iPhone 3G 2.2.1 firmware. But you should read this warning carefully. Presently, you cannot unlock iPhone 3G 2.2.1 firmware using Yellowsn0w. Please use firmware 2.2 if you're planning to unlock. Check out my post on how to unlock iPhone 3G 2.2 firmware using Yellowsn0w.
UPDATED: A good news for iPhone 3G 2.2.1 user, for those who accidentally upgrade to 2.2.1 firmware and intended to upgrade with this latest firmware, now you can unlock iPhone 3G 2.2.1 firmware using YellowSn0w. Check out my post on how to unlock iPhone 3G 2.2.1 firmware using YellowSn0w. Please bear in mind, its only for iPhone 3G 2.2.1 firmware and unjailbroken iPhone 3G. Please ignore the statement above if you understand this matter.
Important: please hold and read through statement below. Before your proceed with jailbreaking you should read quoted from iPhone Dev-Team below. This is the low down on our tools for use with the 2.2.1 firmare from Apple, read the whole post in full before attempting anything. Please note that the Windows version of QuickPwn has been updated to version 2.2.5-2
Note: If you bought iPhone with the new one, you should notice your iPhone has embedded with iPhone 2.2.1 firmware update. You should ignore Step 3 - Step 6. You might be begin jailbreak your iPhone with the Step 7 until complete...For the Step 3 - Step 6, its devoted for those who would like to upgrade their iPhone 3G with firmware 2.0 to 2.2, 2.1 to 2.2 or 2.2 to 2.2.1.
Step 1: Make sure you have upgraded to iTunes 8.0.2 and backup your iPhone data by synchronizing it with iTunes 8.0.2. See instruction here on how to backup your iPhone.
Step 2: Download QuickPwn 2.2.5-2 and iPhone 2.2.1 firmware (3G). Save them all in the same folder. Unzip QuickPwn22.zip and make sure you have all the files in place before continue.
Step 3: This following step will be guide you how to Install your iPhone firmware 2.2.1 via iTunes 8.0.2. Just connect your iPhone to your computer via USB cable and launch iTunes. Select your iPhone in iTunes. You might see all information about you iPhone and the button “Upgrade” and “Restore” appear in iTunes window.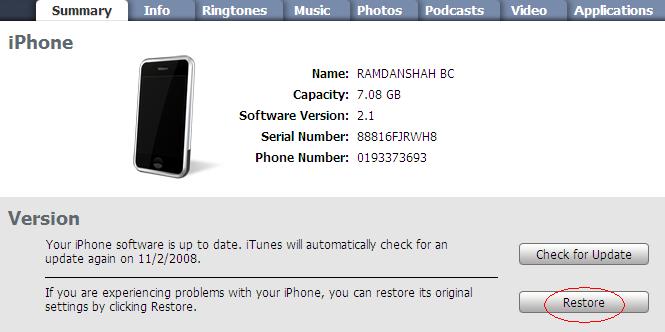 Step 4: Hold the “SHIFT” key and click the “Restore” button simultaneously. The iTunes file dialog will pop up for you to select the firmware file. Locate the “iPhone1,2_2.2.1_5H11_Restore.ipsw” that you have downloaded in previous step and click “Open”.
Step 5: iTunes will then restore your iPhone with firmware 2.2.1 automatically. Keep your iPhone connected, don’t touch anything and wait until the process complete.
Step 6: Your iPhone should completely restore to firmware 2.2.1. But it’s still "Unjailbreak" right now
Step 7: Launch QuickPwn 2.2.5-2 to start jailbreak. Make sure your iPhone connect via USB cable and then click blue button to proceed.
 QuickPwn 2.2.5-2


Step 9: You are required to configure the settings for QuickPwn. Normally, you could mark all checkboxes (i.e. Add Cydia, add installer, Replace boot logo). If you would like to keep the Apple logo already in your iPhone, left “Replace boot logo” unmarked. Click blue arrow button to proceed.

Step 10: Make sure your iPhone should still be connected with USB cable. QuickPwn requests you to confirm it once again before unlock & jailbreak process will begin. If you’re ready, click blue arrow button to proceed.

Step 11: QuickPwn automatically puts the iPhone into recovery mode. After that, you’ll be instructed to hold Home button for 5 seconds. Then hold Home and Power buttons together for 10 seconds. Next, release Power button and continue to hold Home button until your iPhone is in DFU mode (QuickPwn will inform you automatically when you’re in DFU mode).


Step 12: During unlocking & jailbreaking process, your iPhone screen shows downloading jailbreak data and flashing NOR progress. What you have to do just keep waiting and don’t touch anything to your iPhone.


Step 13: QuickPwn will let you know the jailbreak process is successful. Your iPhone will be restarted automatically.

 Step 15: For beginner user, you might be want to know what to do after Jailbreak. Check out my post here on how to use Cydia. For those who already knew about the Cydia you could ignore this step.
Note: If you have problem and troubleshooting during jailbreak using QuickPwn. You may see the details here about fixes and solution.


0 comments
Post a Comment