Showing posts with label jailbreak iPhone 2G. Show all posts

GeoHot has released blackra1n RC3. The blackra1n is a popular jailbreak tool for iPhone 2G/3G/3GS running firmware 3.1.2. Unlike the older jailbreak tools (e.g. PwnageTool or Redsn0w), blackra1n is advertised as the fastest and simplest jailbreak tool. It'll only take you around 30 seconds to complete. And, the jailbreak process is very simple and straightforward. It’s so easy that I doubt if I need to put up a guide for blackra1n. Anyways, not all iPhone jailbreakers are geeks. Probably some of the new comers to the jailbreak world may need some help. So, here is the complete guide for blackra1n that shows you how to jailbreak iPhone 2G running OS 3.1.2.

Please read through the note carefully before your proceed to the next step:
  • Make sure you use iTunes 9.0 or up for the jailbreak. If you are using older version of iTunes, please upgrade it first. You can download the latest version of iTunes from Apple.
  • Before jailbreaking, make sure you have backup all your contacts, sms, photos, etc via iTunes. Simply sync your iPhone and backup the iPhone data.
  • So, does it work with iPhone 2G previously jailbroken with PwnageTool or Redsn0w? Yes, it works!
  • Let me point this out again. This guide is for iPhone 2G.
  • Disclaimer: Jailbreaking may void your warranty of iPhone. Again, jailbreak it at your own risk.
Upgrade your iPhone to OS 3.1.2

1. Download iPhone OS 3.1.2 firmware from here and save it into a folder.

2. Connect your iPhone via USB and launch iTunes. I suggest not to use the docking for the jailbreak. Connect the USB cable directly with your iPhone.

3. Restore your iPhone with iPhone OS 3.1.2. For Windows, hold SHIFT key and click on the “Restore” button and select the firmware file (i.e. iPhone1,1_3.1.2_7D11_Restore.ipsw) you have just downloaded. For Mac, hold option key and click on the “Restore” button and select the firmware file (i.e. iPhone1,1_3.1.2_7D11_Restore.ipsw) to restore.

4. If you’re not using official sim, your iPhone will not be recognized by iTunes after restoration. Don’t worry. It’s normal. You can then close iTunes and continues with the next step.

Jailbreaking With Blackra1n

5. Download Blackra1n from blackra1n.com and save the blackra1n.exe to a folder. Both Windows and Mac versions are available. So, you should download the correct version depending on your OS.

6. After downloading, unzip the blackra1n.zip.

7. Make sure your iPhone is still connected with your computer via USB. Launch blackra1n.

8. Click “make it ra1n” to start the jailbreak.

9. Once you click the button, the jailbreak process starts and it’ll take around 30 seconds to complete.

10. Wait until you see the following message and your iPhone should be jailbroken after reboot. Your iPhone should have been activated and jailbroken.


Installing Cydia

Note: Before proceeding, if you have WiFi connection, I suggest you to first enable it before continuing. This should speed up the download process of cydia.

11. Next, you’ll have to install Cydia. Tap on the “blackra1n” icon.

12. Tap on “Cydia” and then “Install” button to install Cydia. Just wait until the download and installation to complete.

13: For beginner user, you might be want to know what to do after Jailbreak. Check out my post here on how to use Cydia. For those who already knew about the Cydia you could ignore this step.


Unlocking iPhone 2G With Bootneuter

With cydia installed, the whole jailbreak process is complete. But if you need to unlock your iPhone 2G to work with unofficial sim, launch cydia and install bootneuter. After installation, reboot your iPhone and enjoy iPhone OS 3.1.2.

Note: If you want to uninstall blackra1n from iPhone home screen, launch blackra1n again and select “uninstall blackra1n”.

* If you encounter any problem issues during and after jailbreak, you may checkout my post here and look up on to "TroubleShooting & Fixes title".

* If you have a problem with YouTube, GPS and WIFI after jailbreak, checkout here how to fix it.

* If you have a problem with using Disk Aid and iPhone Browser after jailbreak with BlackRa1n, checkout here how to fix it.

Blackra1n is a great jailbreak tool for iPhone 2G, 3G or 3GS running OS 3.1.2. It’s simple and quick. But it does come with some bugs. After jailbreak your iPhone using blackra1n, you may encounter one of the below issues:


  • Fail to launch YouTube
  • GPS doesn’t work if you’re using iPhone 3G/3GS
  • WiFi is not working
I guess GeoHot, the developer of blackra1n, will fix these bugs in the next version update. However, at the mean time, you can follow these workarounds to fix the issues. Perhaps it may help you for this moment.

How To Fix WiFi Issue

To fix the WiFi issue after blackra1n issue, you can simply reset the network settings. Go to “Settings” -> “General” -> “Reset” and select “Reset Network Settings”. Tap on the “Reset Network Settings” button again to confirm. After resetting, the WiFi issue should be fixed.


How To Fix YouTube and GPS Issues

It’s very interesting the PushFix patch, which is originally designed for fixing push notification, can be used to fix the YouTube and GPS issues. After patching with PushFix, your iPhone should be able to use YouTube and GPS.


Developed by iPhone Dev Team, Redsn0w is a replacement of QuickPwn to jailbreak iPhone 3.0. The jailbreak process is very straightforward that any iPhone owner can manage the jailbreak. Visit at iPhone Dev Team Blog for more information about Redsn0w.


Please read through the below notes before taking action to jailbreak your iPhone:

  • RedSn0W only suitable for the recent iPhone OS 3.0 firmware updated.
  • This jailbreak guide is designed for Windows user only. For Mac user, you can use PwnageTool 3.0 to jailbreak.
  • Redsn0w is work for Original iPhone (1st Generation), Original iPod touch, iPod touch 2G and the iPhone 3G (not the iPhone 3GS).
  • This guide is suitable to jailbreak & unlock iPhone 2G (the 1st generation iPhone).
  • If you’re using lower version of firmware (e.g. 1.1, 2.0, 2.1 or 2.2), you can also follow these jailbreak procedures to upgrade the firmware to 3.0. But please bear in mind, that you’ll have to re-install all the Cydia applications after upgrade. And, at the time I write this post, not all Cydia applications (e.g. AptBackup, iBluetooth, Backgrounder, iRealSMS, MySMS, BossTool, Quickgold) are compatible with iPhone 3.0. So, if you have any cydia applications that you rely on, please ensure its compatibility before upgrading.

Step 1:
Make sure you have upgraded to iTunes version 8.2 and backup your iPhone data by synchronizing it with iTunes 8.2.

Step 2: Download RedSn0w 0.7.2 (or download here), Bootloader 3.9, Bootloader 4.6 and iPhone 2G 3.0 firmware. Save them all in the same folder. Extract/unzip Redsn0w. Make sure you have all the files in place before continue.

Installing iPhone 3.0 OS via iTunes 8.2

Step 3: Just connect your iPhone to your computer via USB cable and launch iTunes. Select your iPhone in iTunes. You might see all information about you iPhone and the button “Upgrade” and “Restore” appear in iTunes window.

Step 4: Hold the “SHIFT” key and click the “Restore” button simultaneously. The iTunes file dialog will pop up for you to select the firmware file. Locate the “iPhone1,1_3.0_7A341_Restore.ipsw” that you have downloaded in previous step and click “Open”.

Step 5: iTunes will then restore your iPhone with firmware 3.0 automatically. Keep your iPhone connected, don’t touch anything and wait until the process complete.


Unlock & Jailbreak using RedSn0w

Step 6: Your iPhone should completely restore to firmware 3.0. But it’s still locked right now. Please power off your iPhone (but keep it connected with USB cable).

Step 7: Launch RedSn0w to start jailbreak & unlock. Make sure your iPhone connect via USB cable and then click "Next" button to proceed.


Step 8: You are required to provide the firmware 3.0 IPSW file. Click “Browse” button to locate the “iPhone1,1_3.0_7A341_Restore.ipsw” were you had downloaded in Step 2.

Redsn0w will then verify the firmware file. If it’s correct, redsn0w will show the message “IPSW successfully identified”. Then click “Next” button to continue.

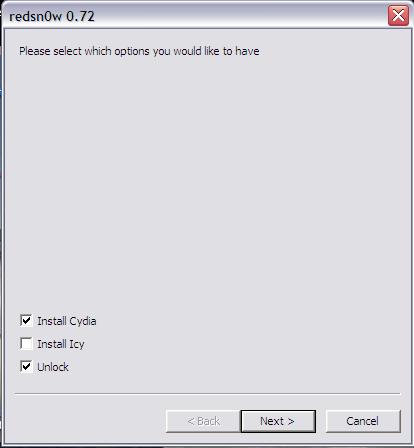
Step 9: You are required to configure the settings for RedSn0w. Normally, you could mark all checkboxes (i.e. Install Cydia, Install Icy & Unlock). If you would like not to install icy, just left “Install Icy” unmarked. Click "Next" button to proceed.

Step 10: Locate the bootloader 3.9 and 4.6 files that you have downloaded at Step 2 by clicking “Browse” button. Then click "Next" button to proceed.

Step 11: Redsn0w will instruct you to put your iPhone into DFU mode. Ensure your iPhone is connected (via USB) and it’s turned OFF. If you’re ready, click “Next” to continue.

Step 12: Redsn0w automatically puts the iPhone into DFU mode. After that, you’ll be instructed to hold the "Power" button for 3 seconds. Then hold "Power" and "Home" buttons together for 10 seconds. Next, release "Power" button and continue to hold "Home" button for 30 seconds until your iPhone is in DFU mode.

Note: Timing is very important here, if you may not be able to put the iPhone into DFU mode for the first trial. Don’t worry. Simply click the “Back” button to go back and try to follow the instructions again. Redsn0w will start the jailbreak process only if it detects your iPhone is properly put into DFU mode.

Step 13: If you have successfully put the iPhone into DFU mode, redsn0w will automatically start the jailbreak process.


Step 14: During unlocking & jailbreaking process, your iPhone screen shows downloading jailbreak data and flashing NOR progress. What you have to do just keep waiting and don’t touch anything to your iPhone.


Step 15: RedSn0w will let you know the jailbreak process is successful. Your iPhone will be restarted and automatically launch BootNeuter to perform unlock. This process will take 3-5 minutes to complete. Just wait until the process been done and your iPhone will be rebooted again.


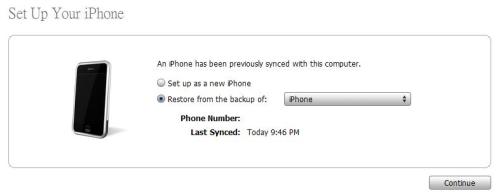
Step 16: Now unlocking & jailbreaking process has complete with iPhone 3.0 OS. Finally, sync back your iPhone to restore your backups data with iTunes 8.2.

Step 17: For beginner user, you might be want to know what to do after Jailbreak. Check out my post here on how to use Cydia. For those who already knew about the Cydia you could ignore this step.

The Dev Team just released a new version of PwnageTool that will jailbreak the iPhone 1st gen., iPhone 3G, and the iPod Touch 1s gen. The new iPhone 3G S is not supported yet.

According to the Dev Team:

This is the low down on our tools for use with the 3.0 firmware from Apple, read the whole post in full before attempting anything. Because of some bugs and unexpected changes this will be a multipart release, starting with the release of PwnageTool for Mac OS X. QuickPwn for Mac OS X and Windows will follow sometime soon, please don’t bug us about it, we are working flat out to get everything finished to release them.

  1. GOLDEN RULE: If you are using a 3G iPhone with yellowsn0w and rely on yellowsn0w to obtain cellular service, then you should NOT use PwnageTool right now. UltraSn0w is not included with this release and therefore your baseband will be locked and unable to use an operator other than the official one it was bought for. UltraSn0w will be release via APT (cydia and icy) soon. If you have an original iPhone (1st generation) then 3.0 unlock works with this PwnageTool release.
  2. Yellowsn0w in its current form will NOT work with the baseband version that is present in the 3.0 update, you will need Ultrasn0w, which will be released sometime soon, Ultrasn0w will work with all iPhone 3G models (but not 3GS), even ones that were previously unlockable, Ultrasn0w (when available) will be released via APT (this means you can get it via Cydia or Icy).
  3. Please read all parts of this post before downloading and using these tools.
  4. Read items 1, 2 and 3 again and again.
  5. At the bottom of this post are the bittorrent files for the 3.0 capable version of PwnageTool.
  6. This app is suitable for the recent 3.0 release.
  7. PwnageTool will NOT work for the iPhone 3GS.
  8. PwnageTool WILL work for Original iPhone (1st Generation), Original iPod touch (1st Generation) and the iPhone 3G.
This will just unlock the 1st gen iPhone. It will not unlock your iPhone 3G or iPhone 3G S. The Dev Team will release Ultrasn0w soon and this is the tool you will need to unlock your iPhone 3G. iPhone 3G S owners will have to wait for the Dev Team to come up with a jailbreak first.

Official Bittorrent Releases -

Unofficial Mirrors

UPDATED: Ultrasn0w is available now via Cydia!. Check out my post here on how to unlock iPhone 3G using Ultrasn0w.


The iPhone Dev-Team have recently replied to Apple’s new iPhone 2.2 firmware with a new version of PwnageTool 2.2 and QuickPwn 2.2. Less than 24 hrs after Apple released the 2.2 firmware, the Dev Team have supplied a stable jailbreak and unlock for iPhone 2G users and jailbreak for iPod Touch 1G users.

There as a few points that you should notice here (Please Read Carefully)


For iPhone 3G

  • They suggest to use QuickPwn for iPhone 3G factory unlocked. You should use PwnageTool 2.2 to jailbreak your iPhone 3G without a factory-unlock, to prevent the baseband update and the future unlocks.
  • The new version of QuickPwn or PwnageTool will NOT unlock your iPhone 3G. iPhone Dev Team is still in process to develop a solution for unlock. And, if you’re using a locked version iPhone 3G and want to unlock in future, please do NOT use QuickPwn and do not use the official IPSW or iTunes update process.
  • In other words, if you’re using iPhone 3G, the only way to have a Safe Jailbreak is to use PwnageTool (Mac only). By using QuickPwn to jailbreak iPhone 3G, you’ll not be able to unlock your iPhone 3G in future, even iPhone Dev Team develops the solution.

For iPhone 2G

  • iPhone 2G (or 1st generation iPhone) user should have no problem with jailbreak & unlock firmware 2.2 using both QuickPwn / PwnageTool. As iPhone Dev Team mentioned, restore your iPhone 2G with iTunes, then run QuickPwn to do the magic.

For those using latest model of Macbook / Macbook Pro / Macbook Air

  • These latest models of Macbooks have an issue with DFU mode of iPhone. Please consider to perform jailbreak on other computers.

Before you update to 2.2 firmware you should aware a several statement from iPhone Dev-Team below. They state on the blog that:

  1. GOLDEN RULE: If you have a 3G iPhone and want potential soft unlock in the near future do NOT use QuickPwn, and do not use the official ipsw or the iTunes update process without using PwnageTool.
  2. Read item 1 again and again.
  3. At the bottom of this post are the bittorrent files for the latest versions of PwnageTool and QuickPwn.
  4. These are suitable for the recent 2.2 release.
  5. Please read all parts of this post before downloading and using these tools.
  6. The ‘late 2008’ MacBook/air/pro line of computers have an issue with DFU mode. While it’s possible to go from Pwned 2.1 -> Pwned 2.2 (using PwnageTool), you can’t yet go from stock to pwned. If in any doubt use a different machine.
  7. Choosing the correct tool is crucial. Be warned!

NOTE: ‘Simple Mode’ in PwnageTool currently only works for the iPod Touch. To use PwnageTool for iPhones you will need to use ‘Expert mode’. This is a workaround while we make an update and fix this issue. In order to do this you will need to navigate to the ‘General’ window and change two things: Deselect ‘activate’ ONLY if you are normally able to activate through iTunes (but if you wish to ‘hacktivate’ the iPhone using PwnageTool then leave it selected). You will also need to change the partition size to about 1000MB (type in the value or use the slider).

‘Hactivate’ means to activate the iPhone yourself without Apple. This is used if you live outside an officially supported region and cannot activate the phone using iTunes.

Baseband 101

The ‘baseband’ is the generic name given to the internal components of the iPhone that handle the phone calls and Internet access. This ‘baseband’ is a tiny and unique independent computer system that runs inside your iPhone, it is separate to the main system that handles the applications (such as email and google maps) and it talks to the main part of the phone over an internal communications network. Think of it like a cable modem or other peripheral that is attached to your home PC that needs occasional updates. When a software update is released and presented to you within iTunes the baseband is sometimes updated (to fix bugs or add new features). The 2.2 update for the iPhone 3G contains such an update, so running the vanilla updater straight away with iTunes will reprogram and update the baseband. This could be bad for certain people, depending on your ultimate aim.

SIM Free/SP Unlocked/Factory Unlocked iPhone 3G

This applies if you bought your iPhone 3G for $$$$$$$. This model of iPhone 3G doesn’t have an Service Provider lock (aka factory unlocked) and you are able to put any SIM card into the phone and get service. Your phone is already unlocked so you do not need to worry about baseband updates, simply upgrade to 2.2 using iTunes and then use QuickPwn to Pwn and Jailbreak. This will add Cydia and Installer too.

Locked iPhone 3G - Preserve Baseband

This applies if you have a locked iPhone 3G and you wish to update to 2.2 but preserve the iPhone’s current baseband software. Preserving the baseband will give you the maximum chance for any upcoming software unlock. To upgrade your phone to 2.2 and preserve the state of the baseband you need to create a custom .ipsw with PwnageTool. This custom .ipsw will not contain the baseband update but of course will still allow all the cool new stuff from 2.2.

There are plenty of tutorials about this process on the web, but PwnageTool contains intuitive graphics and easy to follow prompts that should have you up and running in no time at all.

Locked iPhone 3G

If you are using your iPhone with one carrier and have no interest in the possibility of an iPhone 3G unlock in the near future then just restore or upgrade to 2.2 using iTunes and use QuickPwn to Jailbreak and add Cydia and Installer.

iPhone 2G (1st Generation)

Restore your iPhone 2G with iTunes then run QuickPwn to do the magic, ‘nuff said.

iPod Touch 1G (Original iPod Touch)

Update to 2.2 with iTunes and run QuickPwn.

iPod Touch 2G (New iPod Touch)

Sorry, no support at this time.

Read more details on iPhone Dev-Team blog here.

You can download an updated version of PwnageTool 2.2 for Mac OS X below:

Also you can download via Bittorrent link below:


You may also read the details about new QuickPwn 2.2 update and you can download it here